 Save
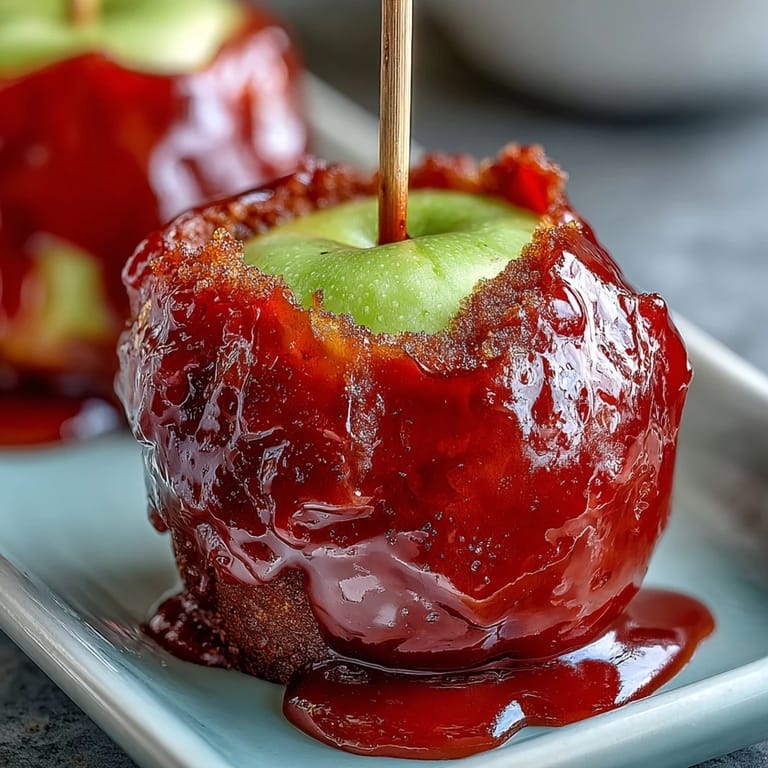
Save My sister brought a box of candy apples to a potluck last spring, and I watched them disappear faster than any dessert I'd ever seen. When she finally revealed they were bite-sized versions on toothpicks, I understood the genius immediately. There's something irresistible about miniature versions of nostalgic treats, especially when they're glossy and jewel-like and you can actually finish one without your hands getting sticky. I started making them that same weekend, and now they show up at every gathering I host. They've become my secret weapon for looking effortlessly impressive.
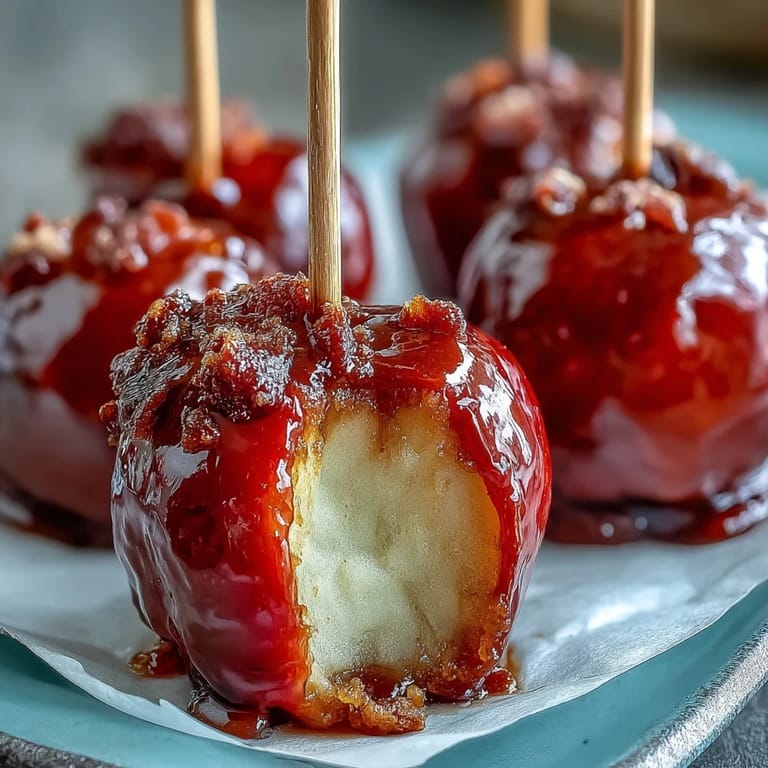
I made these for my nephew's eighth birthday party, and he and his friends treated them like treasure, carefully removing the toothpicks and savoring each bite. One kid asked if I'd made them in a factory, which felt like the highest compliment. Seeing something so simple become the highlight of someone's day reminded me why I love cooking small things for other people.
Ingredients
- 2 large crisp apples (Granny Smith or Fuji): The tartness cuts through the sweetness and keeps these from feeling cloying; softer apples get mushy when you core them, so pick ones that feel firm when you squeeze gently.
- 1 cup granulated sugar: This is your base for the glossy coating; don't skip it or use powdered sugar as a substitute.
- 1/3 cup light corn syrup: This prevents crystallization and gives you that smooth, shiny finish instead of a grainy candy shell.
- 1/4 cup water: Just enough moisture to dissolve the sugar and get the whole mixture cooking evenly.
- 1/4 teaspoon red food coloring: Stir it in after the mixture reaches temperature so the color stays vibrant and doesn't cook out.
- Nonstick cooking spray: A light mist on the parchment prevents sticking without making your apples oily.
- Optional toppings (nuts, chocolate chips, sprinkles): Add texture and visual pop, but only if you apply them within seconds of dipping while the coating's still tacky.
Tired of Takeout? 🥡
Get 10 meals you can make faster than delivery arrives. Seriously.
One email. No spam. Unsubscribe anytime.
Instructions
- Set up your workspace:
- Line a tray with parchment paper and give it a light spray of nonstick cooking spray. You'll be working fast once the candy is ready, so having everything prepped and within arm's reach makes a real difference.
- Prepare the apples:
- Wash and thoroughly dry your apples, then core them carefully and cut into roughly 1-inch chunks. Pat each chunk with paper towels until completely dry; any moisture will prevent the candy from adhering properly.
- Add the toothpicks:
- Insert a toothpick into each apple chunk and arrange them on a separate plate or tray. This step is easier to do before the candy coating gets involved.
- Make the candy base:
- In a small saucepan, combine sugar, corn syrup, and water, stirring just until the sugar dissolves. Once it starts boiling, resist the urge to stir further; just let it bubble away undisturbed.
- Reach the hard crack stage:
- Let the mixture boil for about 7 to 8 minutes, watching your candy thermometer closely until it hits 300°F. This temperature is crucial because it gives you that snap and crackle when you bite into the coating.
- Add the color:
- Remove the pan from heat and stir in the red food coloring quickly and thoroughly. The residual heat keeps the coating workable without cooking out the color.
- Dip with confidence:
- Working as quickly as you can manage, dip each apple chunk into the hot candy, giving it a little swirl to coat all sides. Let the excess drip off for a second or two before placing it on your prepared tray.
- Top while warm (optional):
- If you're using nuts, chocolate chips, or sprinkles, sprinkle them on immediately after dipping while the coating's still sticky. Once it cools, nothing will stick.
- Let them set:
- Allow everything to cool completely at room temperature; this usually takes 30 minutes to an hour. Patience here keeps the coating from cracking when you move them.
 Save
Save There's a particular magic to watching someone's face light up when they realize the candy shell cracks perfectly under their teeth and releases that tart apple inside. That moment of surprise and delight is exactly why I keep making these, even though it would be simpler to bring store-bought desserts.
The Science of That Perfect Crack
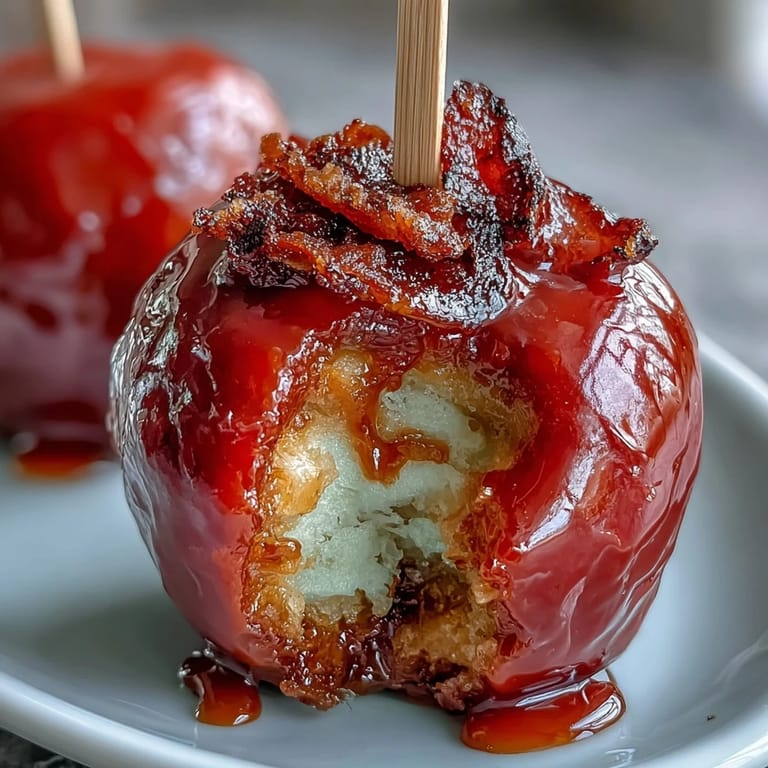
The hard crack stage at 300°F is where all the magic happens. At this temperature, the sugar molecules have lost enough water that they form that signature brittle texture that shatters between your teeth rather than chewy or soft. I learned this the hard way after my first batch turned into lollipops because I didn't let it cook long enough. Now I'm almost obsessive about checking the thermometer every 30 seconds once it gets close.
Why These Disappear So Fast
Beyond the obvious appeal of candy-coated apples, these work because they're portion-controlled and elegant. Nobody feels self-conscious grabbing one or two from a platter the way they might with a full-sized dessert. They're also naturally gluten-free, vegetarian, and impressive enough to serve at fancy gatherings but approachable enough for casual snacking. I've noticed they vanish faster when toppings are involved, probably because the chocolate chips or nuts add visual interest and texture variation.
Troubleshooting and Small Wins
The most common disaster is candy that crystallizes while cooking, which looks grainy and white instead of clear and glossy. This happens when sugar crystals form too early; that's why corn syrup and avoiding unnecessary stirring are essential. I once accidentally knocked my thermometer into the pot when it was almost done, and instead of starting over, I fished it out and kept going, which taught me these candies are more forgiving than I'd thought. Green food coloring works beautifully as a variation if you want to match holiday colors, and mixing apple varieties creates interesting flavor combinations.
- If your coating hardens too fast before you finish dipping, gently reheat it for 30 seconds; don't let it bubble up past 300°F or it'll burn.
- Keep the pan on low heat between batches to maintain temperature without cooking the mixture further.
- Humidity matters more than you'd expect, so avoid making these on rainy days if possible, as moisture in the air can soften the hardened candy.
 Save
Save These little bites have genuinely become part of my gathering routine, and I think it's because they prove that impressive food doesn't have to be complicated. They're a small reminder that sometimes the best moments come from something simple done with intention.
Recipe FAQ
- → What type of apples work best?
Crisp varieties like Granny Smith or Fuji hold up well and offer a balance of tartness and sweetness.
- → How to ensure candy coating sticks to apples?
Make sure apple pieces are thoroughly dried before dipping to help the hot candy adhere smoothly.
- → Can I add toppings to the candy coating?
Yes, sprinkle chopped nuts, mini chocolate chips, or colorful sprinkles immediately after dipping to enhance flavor and texture.
- → What temperature should the candy coating reach?
Heat the sugar mixture to approximately 300°F (hard crack stage) for a crisp, glossy finish.
- → How long does it take for the candy shell to harden?
Allow cooled coated apples to rest at room temperature until the candy fully hardens into a crunchy shell.
- → Are there any safety tips when working with hot candy?
Handle the hot syrup carefully to avoid burns, and keep children away during the boiling and dipping process.